Page 1 of 11 12345 ... LastLast
Results 1 to 20 of 214

Thread: 6.5L Turbo Diesel Blazer Project

  1. #1
    Join Date
    Feb 2000
    Location
    Montana
    Posts
    11,482

    Talking 6.5L Turbo Diesel Blazer Project


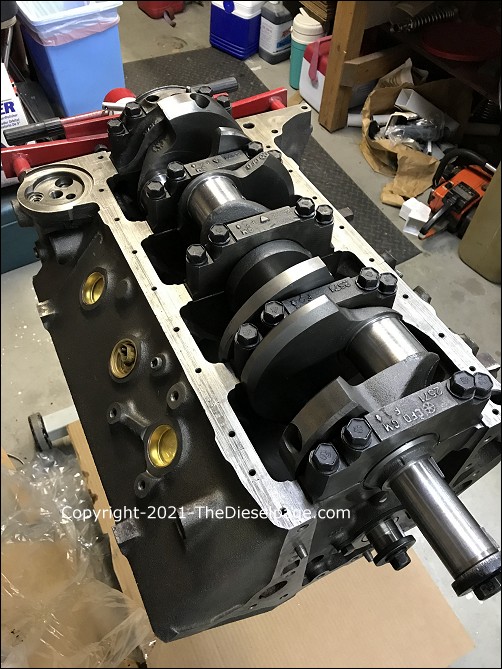
    August 9, 2021 - The adventure begins! This is the way the Blazer's 6.5 looked this morning, after spending yesterday installing new cam bearings (then re-installing the cam) and setting the new crankshaft/bearings into the block. The engine shop that did the machining had already installed new cam bearings, but unfortunately they weren't installed with the oil holes clocked correctly. So, those cam bearings had to come out and a new set of std Clevite cam bearings had to be installed before the original cam went back in. Of course, all of the cam bearing journal clearances were mic'ed before installation. I did use a piece of 1000/1500-grit wet/dry sandpaper (used wet with WD-40) to polish the cam journals and lobes first - followed by a liberal application of assembly lube and motor oil.

    I think the mistake in oil hole location was due to the fact that the engine block has to be upside down when installing cam bearings. The GM service manual's cam bearing installation instructions call out the "clocked" position as though the block is sitting upright and you're facing the front of the block. The theory in oil hole clocking is based on the fact that the incoming pressurized oil has to be applied to each cam journal just ahead of the highest load region of the cam as it rotates - to allow for the thickest oil film on the journal in that high load region. Incidentally, the highest load on the cam is always on the bottom 120 degrees of the cam due to the force applied by the valve springs onto the lifters (and the side load produced by the oil pump drive & timing set).

    Installing cam bearings isn't that difficult when you have the right tool and follow the instructions. Before committing to installing the new bearing set, you could practice re-installing the old bearings (after having removed them), to get a feel for it. The cam bearing installation tool set I used was purchased just for this project. It cost about $100 from an online tool company if I remember correctly. The tool set is easy to use and not hard to figure out. I watched a few YouTube videos... And, I recommend taking a few photos of the original cam bearing installation so you know what "centered" looks like, or how deep to drive them. This sort of info is helpful when doing it the first time...

    Since this photo was taken, all of the pistons/rods have been installed along with the 16 roller valve lifters and the oil pump. The new std bore pistons were all outside diameter mic'ed along with the inside diameter of the 8 cylinder bores, and time was spent matching the minor differences in cylinder bore dimensions to the minor differences in piston diameters. The result from all the piston matching is near perfect (GM spec) piston clearance across all 8 pistons/bores, including the slightly larger spec'ed clearances for the #7 and #8 (rear) cylinders. I also spent some time looking through the various and sundry boxes of parts in preparation for the next step in assembly. Haven't found everything yet, but it's early! I wasn't the one who disassembled this 6.5, so my foggy memory, our 6.2L/6.5L Diesel Troubleshooting & Repair Guide and the GM service manuals (for rebuild specs) will have to suffice with the re-assembly process.

    Onward and upward... My daughter helped me a few of the weekends during the two separate Duramax head gasket replacement projects we completed recently. After a couple of weekends, she looked over at the 1994 Blazer sitting there in the garage with us, and calmly asked what I was going to do with it - such a poker face... Long story short, it's now hers, and we'll work together to make it go. She's a trooper, likes learning and enjoys spending time with her dad. Plus, she'll have a rig to haul a kayak and do some vehicle camping with her friends. We have quite a road ahead of us. Stay tuned!

    Jim

    September 2024 Update - What follows is a recent addition to this forum thread, in the form of a video that represents the culmination of our 6.5L Turbo Diesel Blazer Project. There's more to come, for sure, but this YouTube video will help to bring you up to speed about where the Blazer Project was in early September 2024 - some 3 years and thousands of miles after the process of engine restoration began. The video shown here is a great addition to the story, but... this forum thread still provides a lot of detail and granularity that just couldn't be a part of the video. So, I encourage you to read through this forum thread to learn more about the repairs made to the Blazer and its 6.5L diesel engine. As always, your questions, comments, suggestions and advice are all important. If you found something of value here, please "like" the video and "subscribe" to our YouTube channel (move your cursor over the little circle with the red truck in the upper left of the video image), and let us know what you'd like to see in the future. Thank you.


    Video Introduction: This "Murdered Out" 1994 6.5L Turbo Diesel Chevy Blazer was brought "Back from the Dead" after the engine sat disassembled in a thousand pieces for over 11 years. My daughter and I worked together to solve the problems caused by melted pistons, a gouged crankshaft, and cracked cylinder heads - resulting in a great 6.5L Turbo Diesel powered Chevy Blazer.

    Had fun with this one! Check it out. There are some brand new clips in this 18+ minute video that haven't been shown before... including at the very end where the loaded Blazer is the subject of a video clip that was shot at a scenic location far-far off the beaten path on our way to a high mountain glacial lake here in beautiful western Montana...

    Incidentally... this Blazer has an excellent sounding exhaust system that produces a low rumble under acceleration. This sweet sound
    can be heard in the video when using headphones, but my computer speakers apparently don't reproduce the lower frequency sounds. The fairly short 3-1/2" in 3-1/2" out muffler was a Kennedy product back in the early 2000's. Let me know what you think...
    Jim
    Last edited by More Power; 11-21-2024 at 12:26. Reason: Make it the best ever!

  2. #2
    Join Date
    Feb 2000
    Location
    Montana
    Posts
    11,482

    Talking 6.5L Turbo Diesel Blazer Project

    August 23, 2021 - At the time this was posted the Blazer had spent the better part of the prior 11 years sitting in our garage without an engine... while slowly accumulating dust, and looking more sad and forlorn as time passed. It seems like there were always higher priority projects that prevented me from working on it. Then there were the obstacles, the hurdles - and the complications that got in the way of moving forward. Things like a damaged/gouged crankshaft that required replacement (finally bought a like-new GM crankshaft from a local engine shop for $300 in 2017)... The original small-port cylinder heads were cracked beyond repair, and replacements were hard to come by... unless I wanted Chinese heads or way too expensive new GEP replacements. I finally bought a set of rebuild-able small port GM 6.5 heads a few years ago from a TDP member in MN for $350 (as of the time of this posting, they are at an engine shop being rebuilt).

    When I got the Blazer back (about a dozen years ago) it was rolling on oddball 20" tires/wheels that just wouldn't work, so they were removed and replaced with tires/wheels that were closer to what came on the Blazer from GM (Lil Red's original tires/wheels). Then, there were the hard water deposits all over the exterior of the Blazer. Before I acquired it, the Blazer apparently sat unused for quite some time right next to a sprinkler system that pulled water through what must have been a limestone deposit of epic proportions...


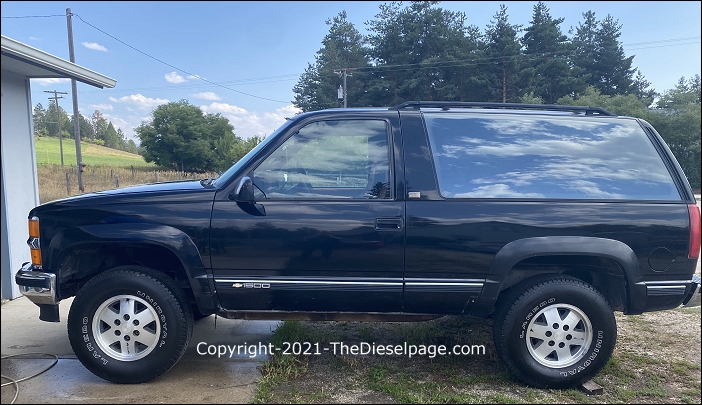
    Rides a little higher than normal in the front... without an engine... After several days of working on the hard water deposits, the above is the result... There really was a Blazer under all that crap. We tried every product and chemical known to Youtube, and discovered that Youtube has not yet found a way to remove 10 year old hard water deposits/stains from auto glass or any other part of a vehicle. I was at a point of considering glass replacement. Unless you have already experienced it, removing fossilized water spots (more akin to the buildup around Old Faithful - a little hyperbole) from auto glass is near impossible. Getting the paint and chrome clean is far easier by comparison, but it's still an ordeal.

    We tried ZEP, CLR, Lysol Toilet Bowl Cleaner (that works wonders on tub/shower hard water deposits), vinegar, and carefully tried other products that contain phosphoric acid (NAPA's Aluminum Brightener & A Must for Rust). None of them would touch the hard water stains/deposits on the glass - none. The Lysol TB cleaner worked best (though not quick) on the paint, but we couldn't use it on the chrome (it'll turn dark). We tried steel wool on the glass, and we tried auto rubbing compound with a power buffer. Wouldn't touch the stuff on glass, and would only polish the water spots on paint/chrome.

    What worked, and did a great job was not found on Youtube... It was a desperate attempt to find something, some combination that would save us from the pit... The saving grace came in the form of a combination - Steel wool and 3M Auto Advanced Rubbing Compound, used together by hand, cut the hard water staining/deposits on the glass and chrome where nothing else would. It actually became... well, maybe not easy, but not all that hard either. The glass is now almost perfect. Looks almost new, in fact.


    Jim
    Last edited by More Power; 11-27-2024 at 12:39.

  3. #3
    Join Date
    Oct 2001
    Location
    Granby, Missouri, USA
    Posts
    3,110

    Default

    Looking good, Jim! I'm glad to see another Blazer being saved.

    Casey
    1995 K1500 Tahoe 2 door, 6.5LTD, 4L80E, NP241, 3.42's, 285/75R16 BFG K02's; 1997 506 block; Kennedy OPS harness, gauges, Quick Heat plugs, and TD-Max chip; Dtech FSD on FSD Cooler; vacuum pump deleted, HX35 turbo, Turbo Master, 3.5" Kennedy exhaust, F code intake; dual t/stats, HO water pump, Champion radiator; Racor fuel filter

  4. #4
    Join Date
    Feb 2000
    Location
    Montana
    Posts
    11,482

    Post

    Quote Originally Posted by arveetek View Post
    Looking good, Jim! I'm glad to see another Blazer being saved.

    Casey
    Thanks Casey,

    Plans include a roll-on bed-liner coating (we used Herculiner) below the belt line, on the fender flares, and applied to the front 6-8" of the hood and 6-8" of the roof. And we'll install some good looking/tough mud flaps and small/good looking steps. It'll be driven on winter roads with road de-icer, so the underneath will get some rust prevention treatment. Along the way, it'll get new steering, suspension and brake parts to make it drive like new. Oh, and Sarah tells me it'll get new audio components... Vroom sounds aren't quite enough...

    Jim
    Last edited by More Power; 09-17-2024 at 09:59.

  5. #5
    Join Date
    Apr 2001
    Location
    Newberg Oregon
    Posts
    12,409

    Default

    LOOKING GREAT
    I wanted one of the GMT400 Class Blazers (Diesel) and could never find one.
    (1) 1995 Suburban 2500 4x4
    (1) 1997 Astro
    (1) 2005 Suburban (Papa Smurf)
    THIS IS BOW TIE COUNTRY

  6. #6
    Join Date
    Mar 2000
    Location
    South Central Pennsylvania, USA
    Posts
    2,696

    Default

    Looks like a good start! I'll be following to see your progress.

    Here's mine:
    '94 GMC 6.5TD K1500 4L80E 2-Door Yukon SLE 221K
    '93 Chevrolet 6.5TD K2500HD NV4500 Std. Cab Longbed 187K
    '85 Toyota 22R RN60 4x4 Std. Cab Shortbed 178K (Currently retired for rebuild)
    Diesel Page Member #2423

  7. #7
    Join Date
    Dec 2003
    Location
    Yukon Canada
    Posts
    1,690

    Default

    Here is my blazer project
    Doing a yard cleanup at my business,it's all mine now as i just paid out the X for her half of my life.I have a big yard out back of my shop where there was 100+ vehicles accumulated after 25 years of running the shop.
    I have plans for the middle of the lot so i am going to limit myself to vehicles double parked down the one property line.
    Then my straight body keepers along the back property line.
    This blazer had been sitting in the back for about 12 years,it's an 81.The diesel still turns over no water in the oil.The body is going to the dump,engine going into dry storage. I have another rust free califonia blazer that got hit hard on the hinge side of the drivers door,that frame is bent so the rust free body is going on the straight frame,and if i don't find a nice blazer at least the pieces i have will make a good start.Plus i reduce the keepers by one.blazer d.jpgblazer b.jpgblazer e.jpgblazer f.jpgblazer a.jpg
    Attached Images Attached Images
    90 Chev 3500 c/c 4x4,6.2na,400 auto,4:10 gears.DSG Timing gears,main girdle, isspro tach, pyro,boost,oil and trany temp.Dual Tstats, High volume peninsular pump,on shelf, Custom turbo and intercooler 85%complete. Change of plans for the dually, it's going to get a Cummins. Both trucks are Blue 90 4x4 crews

  8. #8
    Join Date
    Feb 2000
    Location
    Montana
    Posts
    11,482

    Default

    Quote Originally Posted by trbankii View Post
    Looks like a good start! I'll be following to see your progress.

    Here's mine:
    Nice!! But, no holes in the bumper?

    It's interesting that GM put fender flares on their 2-door diesel Blazers/Tahoes. I wonder if they also put in heavier torsion bars?
    Jim

  9. #9
    Join Date
    Feb 2000
    Location
    Montana
    Posts
    11,482

    Default

    Quote Originally Posted by Yukon6.2 View Post
    Here is my blazer project
    Doing a yard cleanup at my business,it's all mine now as i just paid out the X for her half of my life.I have a big yard out back of my shop where there was 100+ vehicles accumulated after 25 years of running the shop.
    I have plans for the middle of the lot so i am going to limit myself to vehicles double parked down the one property line.
    Then my straight body keepers along the back property line.
    This blazer had been sitting in the back for about 12 years,it's an 81.The diesel still turns over no water in the oil.The body is going to the dump,engine going into dry storage. I have another rust free califonia blazer that got hit hard on the hinge side of the drivers door,that frame is bent so the rust free body is going on the straight frame,and if i don't find a nice blazer at least the pieces i have will make a good start.Plus i reduce the keepers by one.blazer d.jpgblazer b.jpgblazer e.jpgblazer f.jpgblazer a.jpg
    Thanks for saving what can be saved. I know a guy here in Montana who saved a 1965 Mustang convertible... a valuable one that had a famous life, but was burned out totally. The VIN plate survived, so he built a car around it using as many OE parts as he could. Jim

  10. #10
    Join Date
    Dec 2003
    Location
    Yukon Canada
    Posts
    1,690

    Default

    I will continue to save what i can...
    I have a soft spot in my head for the GM diesels
    This summer i have been given a couple GM Diesel trucks that their owners had enough of
    One a truck i almost bought when it was a year old,PO thought he destroyed the tcase,91 4x4,the other a 3500 dump truck with 19.5 tires,both trucks run and still have usable life in them.Since i got my first 6.2 and joined the site i have accumulated a good stash of parts and running engines,i have 6 trucks that haven't been on the road in a while that have the GM diesel in them.
    90 Chev 3500 c/c 4x4,6.2na,400 auto,4:10 gears.DSG Timing gears,main girdle, isspro tach, pyro,boost,oil and trany temp.Dual Tstats, High volume peninsular pump,on shelf, Custom turbo and intercooler 85%complete. Change of plans for the dually, it's going to get a Cummins. Both trucks are Blue 90 4x4 crews

  11. #11
    Join Date
    Oct 2001
    Location
    Granby, Missouri, USA
    Posts
    3,110

    Default

    Here are the most recent pics of my Blazer (Tahoe):


    Mine originally came with a set of factory running boards/fender flare combos, but I swapped them out for the black fender flares. I originally purchased the Tahoe back in 2005 for my wife, but since then I have inherited it and made it more of what I thought it should be like.

    2005, when we purchased it with 174K on the odometer:


    She's been a very reliable daily driver over the past 16 years, accumulating a total of 376K miles until she finally blew a head gasket a few weeks ago. I've got her torn apart and hope to start the reassembly process next week.

    Casey
    1995 K1500 Tahoe 2 door, 6.5LTD, 4L80E, NP241, 3.42's, 285/75R16 BFG K02's; 1997 506 block; Kennedy OPS harness, gauges, Quick Heat plugs, and TD-Max chip; Dtech FSD on FSD Cooler; vacuum pump deleted, HX35 turbo, Turbo Master, 3.5" Kennedy exhaust, F code intake; dual t/stats, HO water pump, Champion radiator; Racor fuel filter

  12. #12
    Join Date
    Mar 2000
    Location
    South Central Pennsylvania, USA
    Posts
    2,696

    Default

    Quote Originally Posted by More Power View Post
    Nice!! But, no holes in the bumper?
    That's come up before. Both my 6.5's were purchased used and neither had the "correct" front bumper when I got it. I have no way of knowing if they came OEM that way or if the front bumpers were damaged and just replaced with what was available from the junkyard?
    '94 GMC 6.5TD K1500 4L80E 2-Door Yukon SLE 221K
    '93 Chevrolet 6.5TD K2500HD NV4500 Std. Cab Longbed 187K
    '85 Toyota 22R RN60 4x4 Std. Cab Shortbed 178K (Currently retired for rebuild)
    Diesel Page Member #2423

  13. #13
    Join Date
    Feb 2000
    Location
    Montana
    Posts
    11,482

    Default

    Quote Originally Posted by trbankii View Post
    That's come up before. Both my 6.5's were purchased used and neither had the "correct" front bumper when I got it. I have no way of knowing if they came OEM that way or if the front bumpers were damaged and just replaced with what was available from the junkyard?
    I had heard that some of the diesel 2-door Tahoe/Yukons didn't have holy bumpers. An oversight or cost saving strategy? Who knows. Ours is a 1994 model, and I believe it has the original front bumper. I replaced the original rear bumper back about 2000 when we owned it the first time (it had taken a small hit in the right corner). Not having holes isn't a big deal cuz these vehicles weren't used to tow heavy, but the holes are an icon of sorts.

  14. #14
    Join Date
    Mar 2000
    Location
    Geneva, IL
    Posts
    364

    Default

    My first purchase in the 6.5 world, I thought my used 3/4 ton had had running lights removed from those holes...
    Rich Phillips
    Member #27
    2019 K-2500 Crew Cab Z71
    Cedar Creek Silverback 33RL Fifth Wheel
    In The Past: '82 6.2 Jimmy Blazer, '93 6.5 GMC K-2500, '01 DMAX K-2500, '09 DMAX K-2500

  15. #15
    Join Date
    Feb 2000
    Location
    Montana
    Posts
    11,482

    Red face More 2-Doors

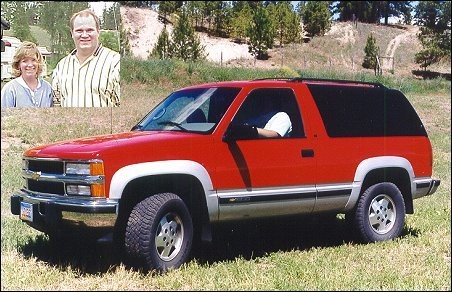
    Here is a selection of photos from various Rendezvous we had where a few 2-door Yukons and Tahoes attended. These had holes...


    Mark Perina's red 2-door Tahoe. It was so nice! Maybe it was the red...


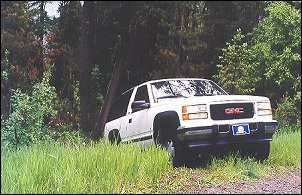
    This white Yukon belonged to member Ron Wong from near Tucson. Here, we were doing a little light trail riding here in Montana during our 2000 Rendez.


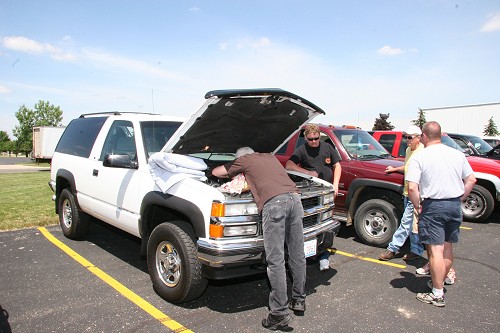
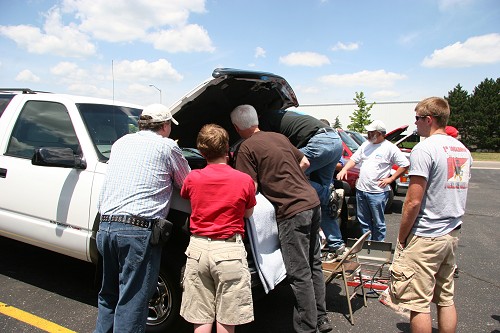
    The above was taken near Grand Rapids MI at our 2006 Rendezvous. Something is going on here. Guess who the guy is wearing the black shirt.... (hint, it's not me).


    Is that Dave? Reminds me of a joke about North Dakotans... "How many North Dakotans does it take to change an injector?" We love North Dakotans here in Montana. They have the same sort of jokes about Montanans... This was taken in the parking lot of Peninsular Diesel in Michigan. Their operation was like a candy store for 6.5 parts. Who could resist upgrading something?

    Jim

  16. #16
    Join Date
    Oct 2001
    Location
    Granby, Missouri, USA
    Posts
    3,110

    Default

    Quote Originally Posted by More Power View Post
    I had heard that some of the diesel 2-door Tahoe/Yukons didn't have holy bumpers. Not having holes isn't a big deal cuz these vehicles weren't used to tow heavy, but the holes are an icon of sorts.
    The holes in the bumper is what I first spotted when I purchased my Tahoe back in 2005. We were driving home from church, I spotted the holes in the bumper on the vehicle in a dealer's lot; I first thought it must have been a Suburban, but when I turned around to go back and check it out, discovered it was a 2-door Tahoe. I went back the next day and bought it!

    Casey
    1995 K1500 Tahoe 2 door, 6.5LTD, 4L80E, NP241, 3.42's, 285/75R16 BFG K02's; 1997 506 block; Kennedy OPS harness, gauges, Quick Heat plugs, and TD-Max chip; Dtech FSD on FSD Cooler; vacuum pump deleted, HX35 turbo, Turbo Master, 3.5" Kennedy exhaust, F code intake; dual t/stats, HO water pump, Champion radiator; Racor fuel filter

  17. #17
    Join Date
    Feb 2000
    Location
    Montana
    Posts
    11,482

    Lightbulb


    The engine is slowly going back together - waiting on the heads now. They have been at the engine machine shop for about 2 weeks, to get a valve job. It's interesting to note that the exhaust valves get stem seals and the intake valve stems just get o-rings.

    The heads are the small port variety, which is what this particular 599 engine had from the factory. Should be better for fuel economy, but I know this 3.73 geared vehicle delivered about 15-17 mpg when we owned it the first time about 20 years ago.

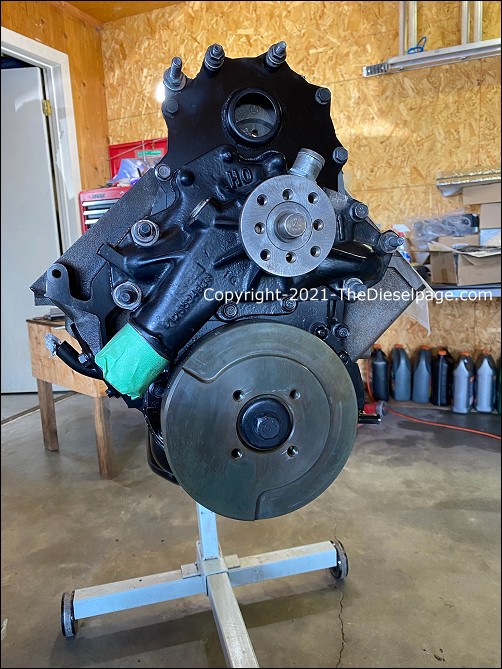
    This image shows the Fluidampr installed. I've had this particular damper since I did the article on them years ago - had never been installed on an engine - I used it for a photo prop back then. The paint fade doesn't affect it in any way, but it's odd how the once jet black coating turned sort of olive drab over time.

    I knew from reading several comments from those who had installed a Fluidampr on their 6.5 that the interference fit over the crankshaft was pretty tight, so I baked this one in the oven for over an hour at ~225 degrees before attempting to install it. While the service manual didn't indicate that a lubricant was necessary, I coated the crankshaft snout and the inside of the hot damper with motor oil before beginning. It went on pretty easily for the first inch or so (about halfway), then it got tight... The GM service manual instructs those installing a damper to use a "mallet" to drive it on. I had my fab/welder guy make an installer for me, but I soon discovered that the PVC pipe I was using under the all-thread wasn't the best choice. Should have used a steel pipe. So... my fall back was a 6" long block of wood and a BFH (Big French Hammer ). Did fine.

    The cam bolt was torqued to 125 ft-lbs and the damper bolt was torqued to 200 ft-lbs. I would have liked to have had a timing gear set, but instead installed a new chain from uniquediesel.com. There was about 1/4" or a bit more slack in the chain, which is pretty good for a new chain.

    Also shown in this image is the newly installed water pump... an "HO" type. I've been saving this water pump for a long time. It had been a new take-off that Peninsular sent to me years ago. I actually have quite a few new or like new parts that I've been saving for a long-long time that'll now find a home. Jim
    Last edited by More Power; 09-22-2021 at 09:46.

  18. #18
    Join Date
    Apr 2001
    Location
    Newberg Oregon
    Posts
    12,409

    Default

    Getting the dampers on can be easily accomplished using a Threaded rod screwed into the crank shaft (Bottomed out in the thread) and a heavy washer over the end of the damper.

    Install a nut on the thread rod and wind that bad boy on there.

    Liberal coating of never seaze on the threads and under the nut.

    Metric thread rod can take some searching....but is available.......

    IIRC I was in a hurry and just grabbed a new metric bolt at the ACE Hardware...Cut the head off...then turned up a little sleeve to slip over the bolt....Then welded the metric bolt to the sleeve and added a length of SAE thread rod to do the work.... FINE THREAD...


    Once you have these little helpers....they can find a home in the tool box for another time...
    Right along side the puller used to get the damper off....

    Looking great Jim
    Going to be sweet to see this old girl running again....
    (1) 1995 Suburban 2500 4x4
    (1) 1997 Astro
    (1) 2005 Suburban (Papa Smurf)
    THIS IS BOW TIE COUNTRY

  19. #19
    Join Date
    Feb 2000
    Location
    Montana
    Posts
    11,482

    Post

    Robyn,

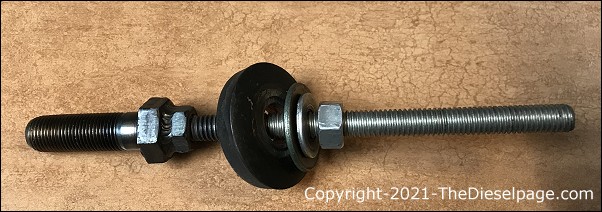
    I had my fab guy make this for me a while back, along the lines of what you mentioned. I gave him an old damper bolt (I had chased the threads so it wouldn't damage the crank threads), a nut and a length of all-thread. He TIG welded it together for me.


    I would run the 18m bolt all the way into the end of the crankshaft by hand. The problem was that as you get the damper over halfway on, the big washer in this pic butts up against the nut/all-thread, so I needed a sleeve to go over that. I thought a short length of PVC pipe would work as a spacer. It wasn't strong enough. I should have had a short length of steel pipe. Jim
    Last edited by More Power; 10-16-2024 at 11:29.

  20. #20
    Join Date
    Apr 2001
    Location
    Newberg Oregon
    Posts
    12,409

    Default

    Looks pretty much like mine

    I took the head of the bolt off and then no worries
    (1) 1995 Suburban 2500 4x4
    (1) 1997 Astro
    (1) 2005 Suburban (Papa Smurf)
    THIS IS BOW TIE COUNTRY

Similar Threads

  1. 85 k5 blazer 6.2 turbo conversion
    By jasonh in forum 6.2L Diesel - Tech Support - Troubleshooting - Performance
    Replies: 2
    Last Post: 01-18-2017, 10:33
  2. Cucv Blazer Turbo 400 same as Civilian
    By darkroad in forum 6.2L Diesel - Tech Support - Troubleshooting - Performance
    Replies: 4
    Last Post: 01-22-2007, 19:55
  3. My 6.2L turbo project update
    By arveetek in forum 6.2L Diesel - Tech Support - Troubleshooting - Performance
    Replies: 25
    Last Post: 06-29-2004, 13:37
  4. How about a Twin Turbo 6.5 in a 73-74 Blazer?
    By Uncle Wally in forum 6.2L/6.5L Diesel - Upgrades & Service Questions Answered
    Replies: 10
    Last Post: 03-06-2004, 15:08

Tags for this Thread

Posting Permissions

  • You may not post new threads
  • You may not post replies
  • You may not post attachments
  • You may not edit your posts
  •